Search for answers or browse our knowledge base.
Allworx Phone System
Staff Initial System Setup
Record your name: (from your extension)
- Lift handset and press “Messages” button twice OR double click the “Voice Mail” contact if using a softphone OR hold the “1” key for 3 seconds if you are on a cordless phone.
- Enter your temporary PIN (1234) followed by “#”.
- Follow system voice instructions to change your PIN.
- Press 4 to change message center system settings.
- Press 2 to change the recording of your name.
- Follow system voice instructions to record your name and press 1 when done.
- Hang up.
Record your greeting: (from your extension)
- Lift handset and press “Messages” button twice OR double click the “Voice Mail” contact if using a softphone OR hold the “1” key for 3 seconds if you are on a cordless phone.
- Enter your PIN followed by “#”.
- Press 4 to change message center system settings.
- Press 3 to manage your greetings.
- Press 0 to manage your default greeting.
- Press 1 and record your greeting after the tone. Press “#” when done.
- Press 1 to save your greeting.
-
Hang up.
Standard greeting script:
Hi, this is (your first and last name), (your title) for (your practice name). I am sorry that I’m not available to answer your call at the present time. Please leave your name and number, along with a brief message after the tone and I’ll contact you as soon as possible
Phone Handset Layout
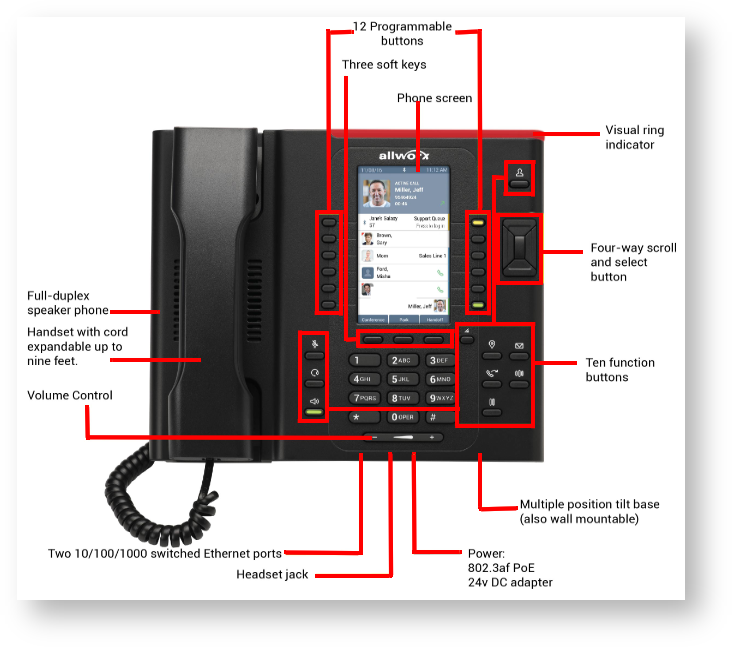
The “Visual Ring Indicator” is also lit when phone user is engaged in a call.
Placing a Call
|
Destination
|
Dial Pattern
|
Example
|
|---|---|---|
| Internal Staff Extension | 3-digit extension number | 100 |
| Number Within your Home Area Code | 9 + 7-digit phone number |
9-555-5555 |
| Number Outside of your Home Area Code | 9 + 1 + 10-digit phone number |
9-1-555-555-5555 |
| International Number | 9 + 011 + country code + city code + phone number |
9-011-49-555-555-5555 |
- When calling from Allworx Interact, dialing “9” for an outside line is not required.
- For help with international dialing, navigate to: https://countrycode.org/how-to-call
Dialing using a PIN Code
In some cases, a PIN code may be assigned to a phone at the request of management to prevent dialing by unauthorized users. To dial with a PIN Code, refer to the pattern and example below:
|
Dial Pattern
|
Example
|
|---|---|
| 78 + PIN Code + 1 + 10-digit phone number | 78-12345-1-555-555-5555 |
Dialing Shortcuts
|
Number
|
Description
|
|---|---|
| 9 | Outside line access to dial external call |
| 404 | Message Center |
| 3 + Extension | Access staff member voicemail directedly without ringing phone. |
| 6 + Extension | Access staff member message center account from any extension. |
| 7 + Ringing phone’s extension | Answer ringing phone of another team member. |
| 0 | Returns callers to the main auto-attendant while listening to any greeting including voicemail. |
| # | Allows callers to skip voicemail greeting and immediately leave a message. |
Team Queue Calls
- Administrative user handsets will be configured with a “Team” Queue appearance button which will answer inbound office calls.
- All handsets configured for “Team Queue” calls will ring when call enters the queue and callers will hear on hold music until the calls are answered.
- If you are working with a patient, keep in mind that you don’t need to immediately answer the queued call since calls will queue for 5 minutes (default setting) before going to voicemail.
- When a call comes in through a queue, it will show on your phone display as a “Team” call but when answered, the system will additionally show caller ID information. After a serviced call is ended, call history information will show on your phone and in Allworx Interact “Call History”.
- You may want to turn down your phone ringer if you are working with a patient to avoid distraction.
Check Personal Voicemail Messages
- Press the Messages button on your phone once for the Visual Message Center or twice for the Audio Message Center and enter your voicemail password.
- If using a softphone, double click the “Voice Mail” contact, to access the Audio Message Center and enter your voicemail password.
- To check your messages from any other Allworx phone, dial 6 + your extension to access the Audio Message Center.
- To check messages from outside the office, dial the main office number and when the greeting begins to play, dial 404 to access the Allworx Message Center. Then follow the prompts to access your voicemail box.
The following shortcuts are available while listening to a voicemail message when using the Audio Message Center:
| *1 | REPLY to this message. | *6 | Play the NEXT message. |
| *2 | FORWARD this message. | *7 | REWIND the message 10 seconds. |
| *3 | DELETE this message. | *8 | FAST FORWARD the message 10 seconds. |
| *4 | REPLAY this message. | *9 | CALL BACK the user who left the voicemail. |
| *5 | Play the PREVIOUS message. | *# | SKIP to the end of the message. |
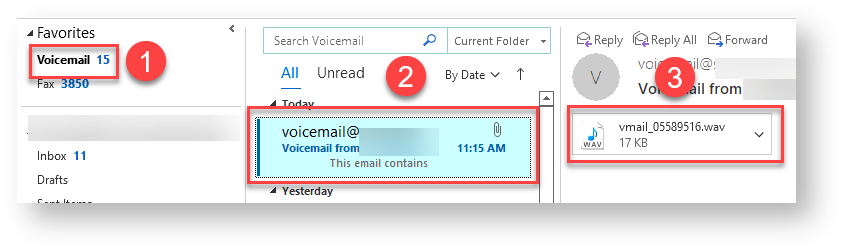
Check Team Voicemail Messages
- Log into Email Account: Open Microsoft Outlook or Outlook Web Access client and log into your email account.
- Navigate & Play Messages: Click to access your “Voicemail” folder, navigate to the desired message you would like to play, click to open attached voicemail audio file, and listen to message through your headset, headphones, or computer speakers.

- Mark Messages Completed: One you have listened to a message, to inform all team members that the message has been listened to and addressed, right click flag icon to right of email message and select “Mark Complete”.


Voicemail Tips:
- Bypass Greeting: To bypass a greeting you are presently listening to and leave a voicemail immediately, press “#”
- Call Extension within User’s Voicemail: While listening to another user’s voicemail greeting, dial * plus the extension number to be immediately transferred to any internal extension.
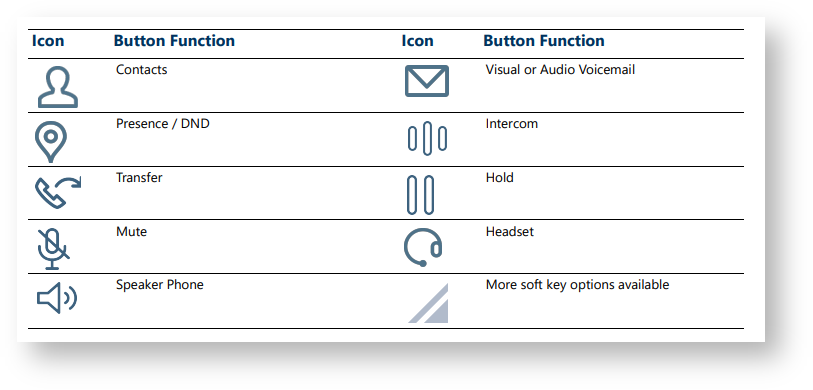
Handset Call Handling Buttons
Handset Navigation/Select Buttons
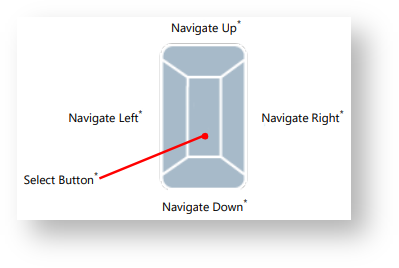
Allworx Verge phones with 12 programmable buttons feature 4 pages of function buttons (48 total) that can be dedicated to internal or external contacts and other features. To navigate to other function key pages, locate function buttons on upper right edge of phone, select the navigate left, navigate up, navigate right, or navigate down buttons which will reveal a new page of function buttons, and press desired function key. Press the middle select button to go back home. The navigation buttons are also used for settings menus.
Phone Handset Status Indicators
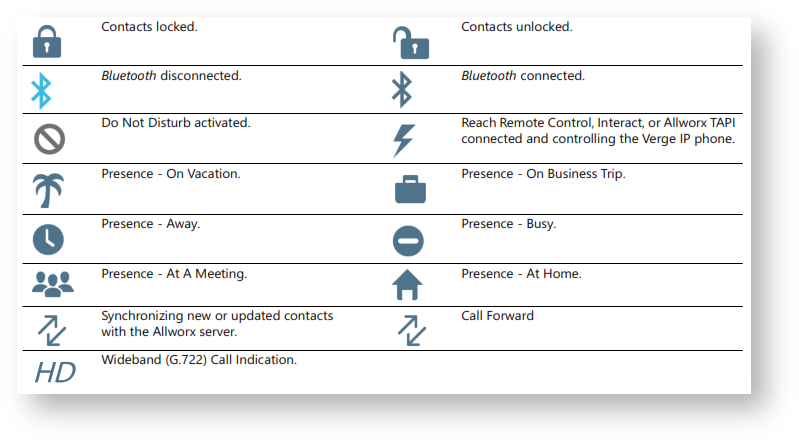
The status indicators are located on top of phone display.
Call Transfer (attended)
- Press the Transfer button. The current call is placed on hold.
- Press staff member contact button, dial staff extension, or dial external phone number of the intended recipient.
- Wait on the line to announce the transfer to the intended recipient when they answer the call.
- Press the Transfer button soft key to complete the transfer.
Call Transfer (blind)
- Press the Transfer button. The current call is placed on hold.
- Press staff member contact button, dial staff extension, or dial external phone number of the intended recipient.
- Hang up.
3-Way Conference
After connecting to the first person, follow these steps to initiate a 3-way conference:
- With the 1st person on the line, press the Conference button.
- Press staff member contact button, dial extension, or dial external phone number of the intended recipient of the conference.
-
Press the Merge Calls soft key.
During the active conference call, the originator can press one of the following soft keys:
- Options – select a party and do one of the following:
- Place the selected party on hold while the remaining parties continue a discussion. To re-add the
party to the conference call, press the Conference soft key, and then select the party on hold. - Disconnect the selected party from the call while the remaining parties continue a discussion.
- Place the selected party on hold while the remaining parties continue a discussion. To re-add the
- Add Call – add a fourth caller to the conference call.
- Leave – exit the conference call while allowing the other callers to continue the conversation. This
feature is only available during a 3-way conference call.
- Options – select a party and do one of the following:
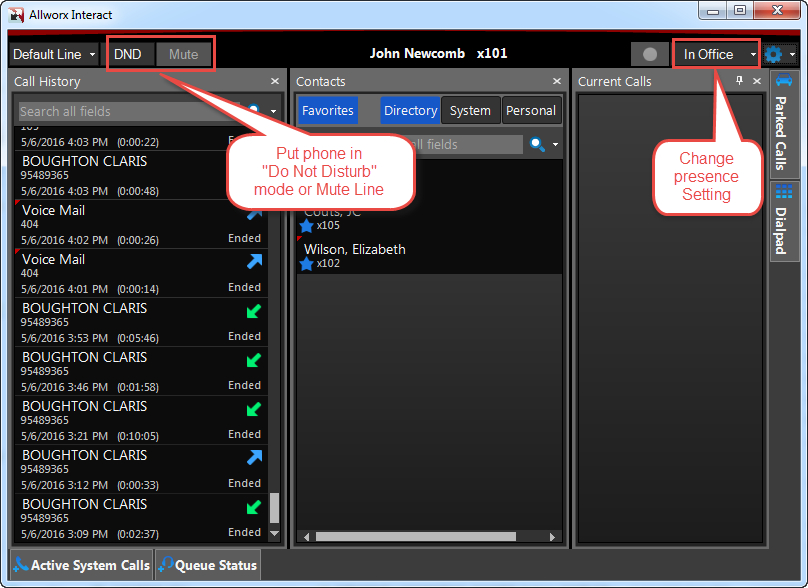
Change Presence Setting
- Press the Presence button and a list of presences will appear on the display.
- Use the up/down navigation buttons to choose a desired presence, then press middle Select button.
- Recording a Unique Phone Presence Voicemail Greeting: A unique voicemail greeting can be configured for each presence setting. To record a greeting for a presence setting, access the message center by pressing the phone voicemail button twice and follow the instructions to record a voicemail for any of the available presence settings (In Office, At a Meeting, On Vacation, On Business Trip, At Home, Away, and Busy). When a caller listens to your voicemail when your phone is in the designated presence setting, they will hear the associated greeting you recorded.
- Setting a Custom Phone Presence Call Route: For any presence setting, call routing can be configured to forward your calls to another phone either immediately or after first trying your office phone. Call routing is very flexible and can be configured in many ways – please contact DHS support if you would like assistance setting up call routing for any of your phone presence settings.
- Presence and DND Function: By default, if a presence setting is selected another than “In Office”, your phone will enter DND (do not disturb) mode and calls will be routed to your voicemail.
Parking a Call
- With a caller on the line, press the Park soft key – the parking extension number will be displayed briefly on the phone’s screen.
- Notify the intended recipient of the call that there is a call parked for them to pick up when they are ready to accept it.
-
When the recipient is ready to pick up the call, they will press the Parked Calls soft key, then use the up/down navigation buttons to highlight the parked call, then press the “Retrieve” soft key.
- By default, parked calls will be transferred to Office Team Queue if not picked up in 5 minutes.
- Parked calls can also be picked up using Allworx Interact using the “Parked Calls” pod.
Call Handoff
-
Press Handoff soft key.
- The Call Handoff feature allows for seamless transition between your desk phone handset and the Allworx Reach mobile app on your Apple or Android smartphone.
- The Call Handoff feature does not work with Team Queue calls.
Use the up/down navigation buttons to select receiving device and press press middle Select button to transition the call.
Log Into Another User’s Phone (Hot Desk Function)
When occupying another staff member’s desk, it is possible to log into their phone as yourself so you can receive all your calls, just as you would at your own desk. To hot desk into any phone in your office, do the following:
- With the handset on-hook, press the “More” function button, press the “Settings” soft key, use the up/down navigation buttons to select the Hot Desk option, and press middle Select button.
- Enter your Allworx extension number, enter your PIN, and press the “Done” softkey.
- In a few moments, the phone will show your name and extension number and you can now receive calls at your extension.
Manually Change Phone Schedule Mode
To manually enable Day or Night mode, do the following:
- Press the Schedule function key on the right hand side of your phone configured by DHS support.
- Confirm mode and press “OK” soft key.
- Note that schedule indicates “Open” and shows a Sun icon OR “Closed” and shows a Moon icon depending on desired mode.
To manually enable a custom greeting, do the following:
- Press the Schedule function key on the right hand side of your phone configured by DHS support.
- Press “Options” soft key on bottom of display.
- Use the up/down navigation buttons to select “Day/Night Mode”, press middle Select button, use the up/down navigation buttons to select “Night” if office will be closed or “Day” if office will be open, press middle Select button, and press “Back” button on bottom of display.
- Use the up/down navigation buttons to select “Greetings”, press middle Select button, use the up/down navigation buttons to select desired greeting, press middle Select button. and press “Back” button on bottom of display.
- Press “Cancel” soft key and “OK” soft key to save settings.
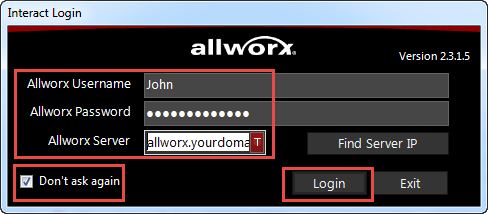
Interact Login
Allworx Interact is the desktop software component to the Allworx phone system.
- Launch Interact: In most cases, Interact will automatically launch when you log into your computer but if it does not, double click on the “Interact” icon on your desktop.
- Enter your Login Information:
- Allworx Username: Username specified during your system training session.
- Allworx Password: Username specified during your system training session.
- Allworx Server: Click “T” button and enter “allworx.yourdomainname.com“. For example if your website domain was “smilesdental.com” you would enter allworx.smilesdental.com.
- Select “Don’t Ask” Option & Log In: Click to check the box “Don’t ask again” so automatic login is enabled and click “Login” button.

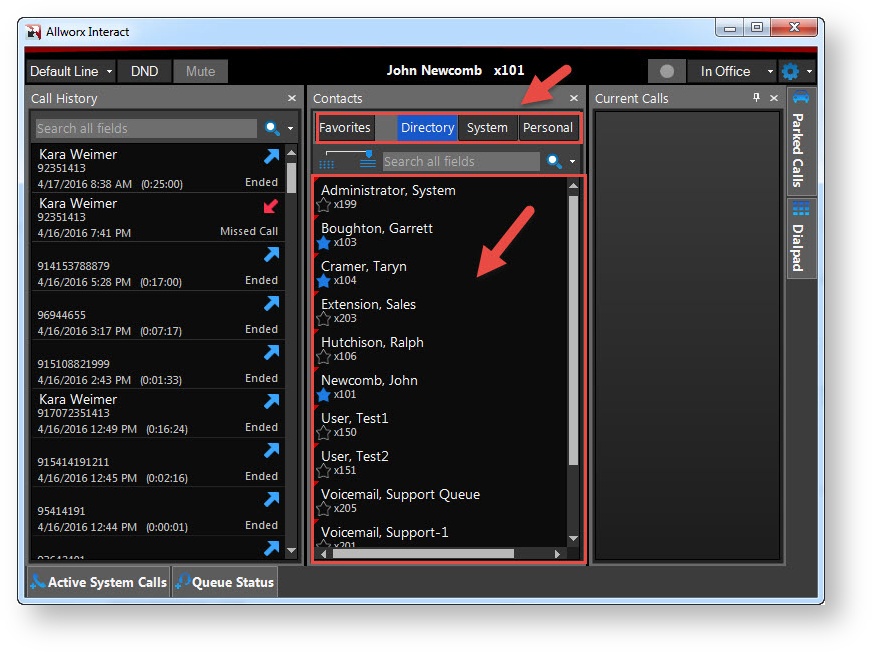
Interact Phone Directory & Contacts
- View Desired Contacts by Selecting Filters:
- Directory filter: click to show all internal phone user extensions.
- System filter: click to show all internal system (non-user) extensions.
- Personal filter: click to show all contacts with phone numbers in your Outlook person contacts list.
- Favorites filter: click to show all extensions or contacts you have marked as favorites (to mark any extension or contact as a favorite, right click on the contact and select “Favorite”).
- Dialing Contacts: Dial any contact by double clicking on it.
-
Searching Contacts: Search for any extension or contact by entering any identifying information info the “search all fields” box in the “Contacts” column.
Filters can be clicked on (will turn blue when on) or off depending on what you would like to show in the window. To see all user extensions in your directory that you have marked as favorites for example, click “Directory” and “Favorites” so both are selected and show in blue.
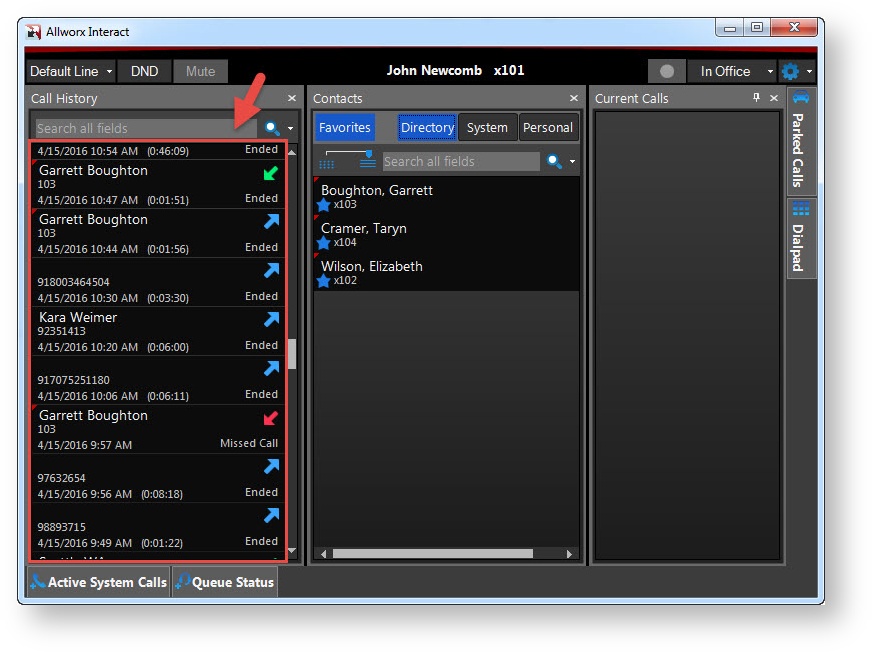
Interact Call History
- Calls are Logged: Each call is logged and shows caller ID if available, date & time, and duration.
- Call Type is Distinguished with Icon: Outbound calls are marked with a blue arrow pointing outward, answered, inbound calls are marked with a green arrow pointing inward and missed inbound calls are marked with a red arrow pointing inward.
- Dial using Double Click: Double click to dial any number in the list.
- Use Search Field to Search Call History: Search for any call by entering any identifying information info the “search all fields” in the “Call History” column.
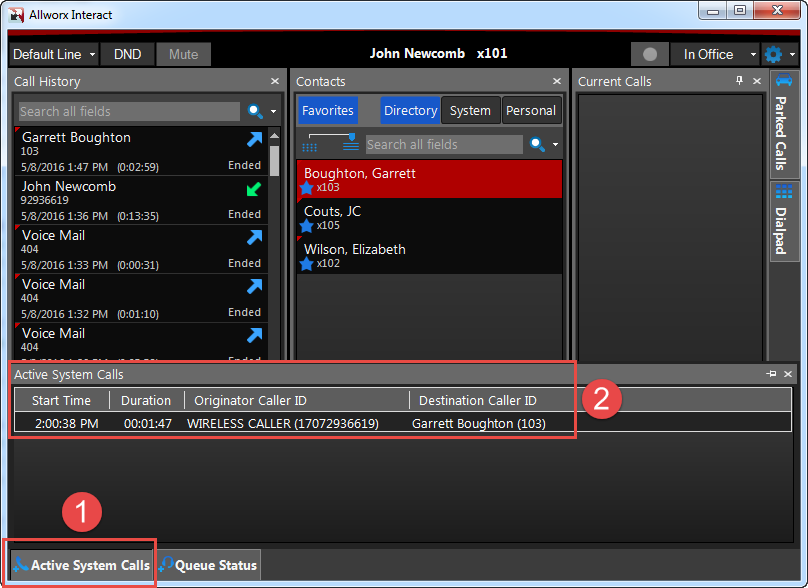
Interact Active System Calls
The “Active System Calls” pane shows whom staff members are talking with currently.
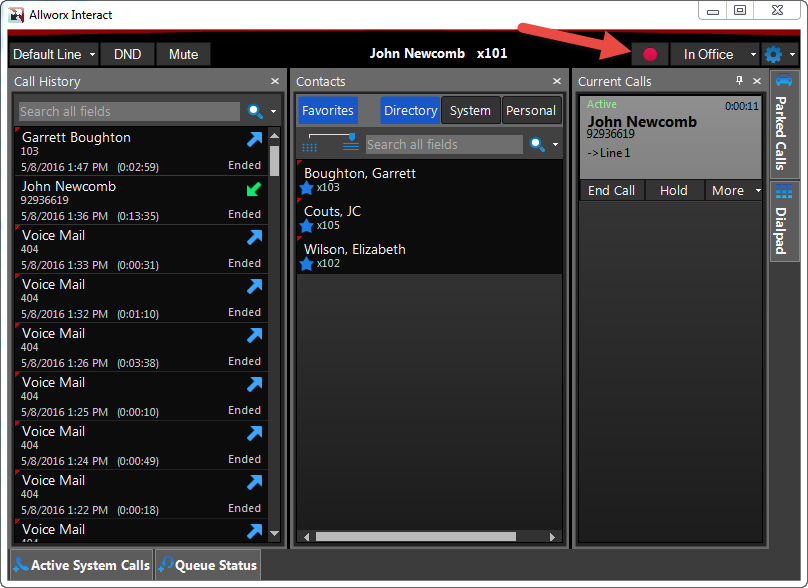
Interact Call Recording
To record an active call or call conference, click the Call Record button. Recorded calls are automatically saved to your “RecordedCalls” folder located in your computer “Documents” folder.
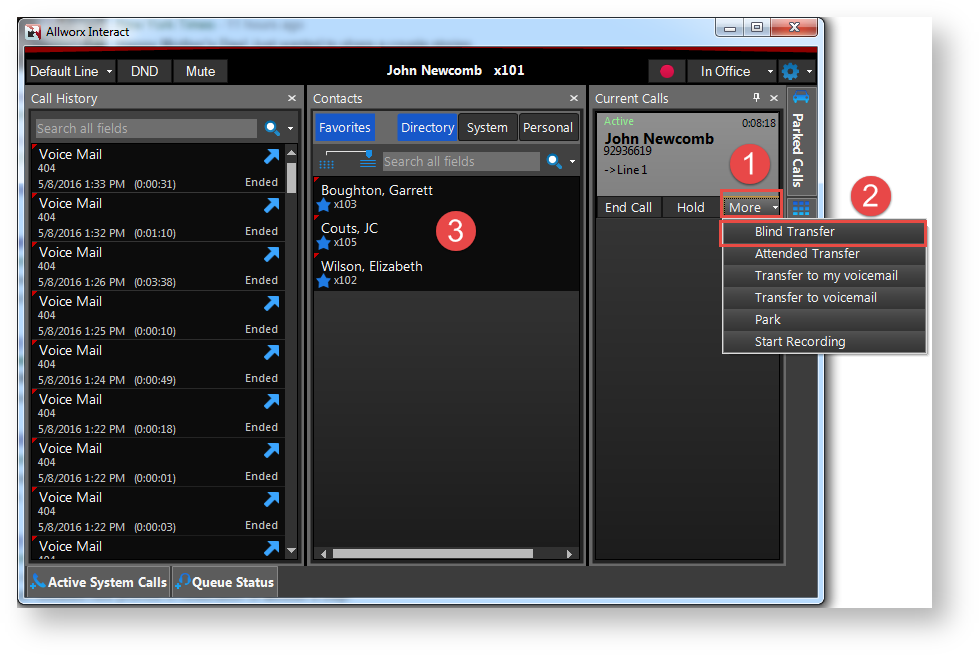
Interact Call Transfer (blind)
Perform the following steps to perform a blind transfer.
- Click “Blind Transfer” Button: With a caller on the line, Click “More” and click “Blind Transfer”.
- Select Transfer Target: Under “Contacts” click the person you would like to transfer the call to (you can transfer to any contact in your organization, outside of your organization, or to any caller listed under “Call History”).
- Hang Up: The call is immediately transferred to the call recipient.
*Alternately, you can right click on the contact you wish to transfer the call to and you’ll be presented with call control options.

Interact Call Transfer (attended)
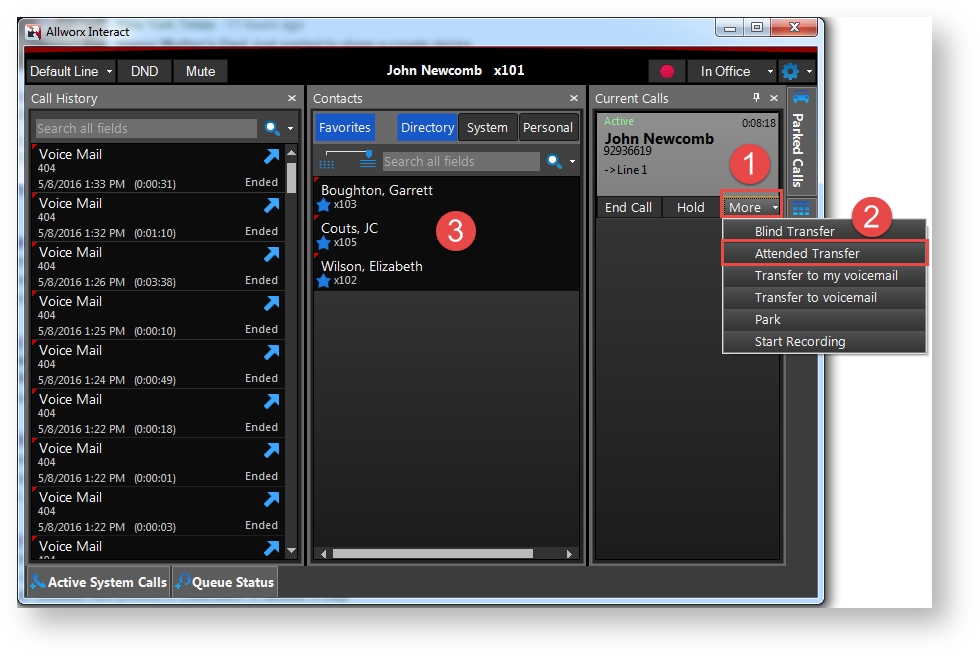
Perform the following steps to perform a attended transfer.
- Click “Attended Transfer” Button: With a caller on the line, Click “More” and click “Attended Transfer”.
- Select Transfer Target: Under “Contacts” click the person you would like to transfer the call to (you can transfer to any contact in your organization, outside of your organization, or to any caller listed under “Call History”).
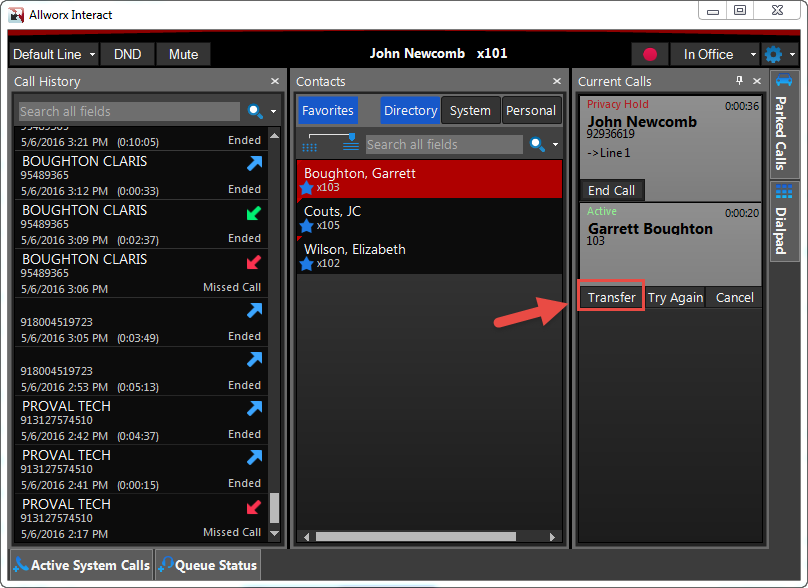
- Announce the Call: Wait on the line until your recipient answers to announce the transfer.
- Complete the Transfer: Once the call is announced, click “Transfer” to transfer the call.
*Alternately, you can right click on the contact you wish to transfer the call to and you’ll be presented with call control options.
Interact Call Transfer (directly to voicemail)
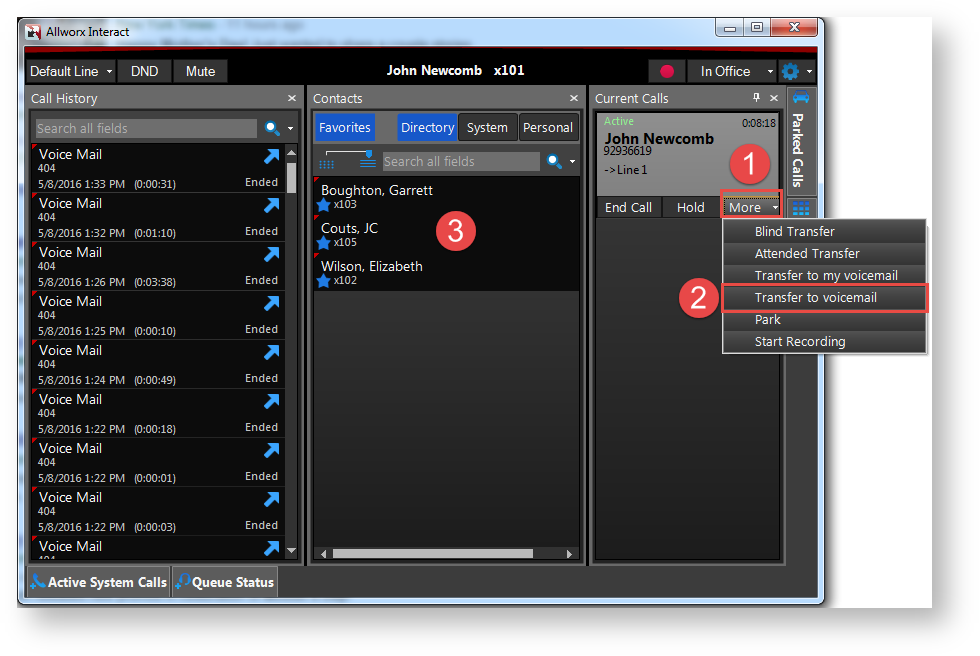
Perform the following steps to perform a voicemail transfer.
- Click “Transfer to Voicemail” Button: With a caller on the line, click “More”, and click “Transfer to voicemail” (you can also select “Transfer to my voicemail” to transfer the call to your voicemail instead).
- Select Transfer Target: Under “Contacts” click the person you would like to transfer the call to (you can transfer to any contact in your organization, outside of your organization, or to any caller listed under “Call History”).
Interact 3-Way Conference
- Call 2nd Person: With the 1st person on the line, select another line on your phone (1st person will automatically be put on hold) and call the second person. If you already have a 2nd caller on the line this step can be ignored.
- Click “Conference” Button: On 2nd call appearance, click “More” and click “Conference”.
- Start Conference: All three callers are now able to conference. To remove a caller from the conference, click “End Call” next to caller you want to remove.


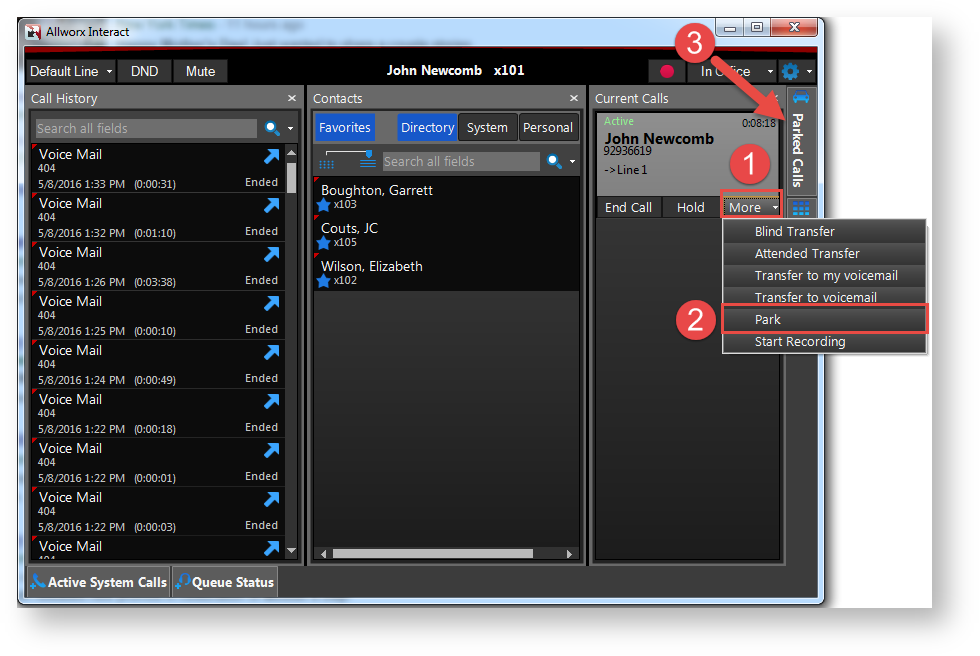
Interact Parking a Call
- Click “Park” Button: Click “More” and click “Park”.
- Notify Recipient: Notify the intended recipient of the call that there is a call parked for them to pick up when they are ready to accept it.
- Recipient Picks up Call: When the recipient is ready to pick up the call, they will click “Parked Calls” and double click to retrieve the call.
Interact Other Options